Showing posts with label Arduino Yun. Show all posts

Friday, January 13, 2017

Arduino as a Microcontroller Reference Platform

The Arduino line of microcontrollers has, arguably, been the spark that brought programmable hardware to Makers worldwide. This article takes a look at how Arduino furthered the use of microcontrollers and how it is important defining standards today.

Arduino dates back to Hernando Barragán's design of the Wiring platform in 2004. In 2005, Massimo Banzi, with David Mellis forked the Wiring source code and started running it as a separate project. Arduino use grew through successive product releases including the Arduino Diecimila, Arduino Duemilanove, and the baseline Arduino Uno board series (in its third revision). The evolution set the Atmel ATmega328P microcontroller in the Uno to become the microcontroller standard of its time.
The Arduino Uno R3 (photo via Adafruit)
The ecosphere of Arduino, consisting of the circuit board and Arduino Integrated Development Environment (IDE) became very compelling for developers. Many software libraries were created to extend Arduino software capability and hardware connectivity. This growing capability launched the ATmega328 into many project designs. The success of the Uno board design led to other companies and makers to make Uno compatible boards based on the '328. The price of the Uno was set at the time at $35 and it did not go on sale often, requiring an investment on the purchase of each board.

In expanding the Arduino product line, the Arduino team introduced other boards based on newer microcontrollers. Some have been more widely adapted into maker designs than others. Many software libraries required changes to support different microcontroller architectures.

The development of the Atmel ATmega328P has evolved from the ATmega168 and smaller ATmega8, which all use the Atmel's AVR architecture. The '328 chip runs at a nominal 16 MHz (on the Uno) with 32 kilobytes of flash memory. This is modest by computer standards, but this chip equalled much of the industry when it was introduced.

The Arduino team, in looking for better designs, introduced the Arduino Leonardo. Leonardo was based on the Atmel ATmega32U4 microcontroller with the same 32kB of flash at 16 MHz. The chip was mostly compatible with the '328 but also had the feature of native USB controller onboard, eliminating the need for a separate USB chip on boards such as Uno. The Leonardo was less popular than the Uno but found some interesting uses due to features not found in other microcontroller boards. The native USB was very popular with other company/Maker board designers who, to this day, use the ATmega32U4 and the Leonardo software to make compelling microcontroller boards at a low cost.
Arduino Leonardo (photo via arduino.cc)
Sadly the Leonardo has been discontinued by the Arduino team but the use of the ATmega32U4 lives on in many new designs.

The Arduino Due was the Arduino team's first commercial step into the Atmel SAM architecture chips. SAM features an ARM processor, capable of speeds much higher than the Uno/Leonardo 16 MHz and also capable of more flash and other compelling features. The Due, being the first Arduino SAM board did (has) not find (found) a wide following in products or maker projects but it did (has) start software migration of the Arduino software base to use non-AVR chips. (Note: While announced as discontinued, they are still available via arduino.cc).

Note: Yes, I am skipping some Arduino releases here and there which are also AVR based designs.

The Arduino Zero, beta tested in 2014 with release in 2015, has become the new tier for microcontroller designers. Based on the newer Atmel/Microchip SAMD series, the board provides the SAM higher clock rates, ARM core, and a much smaller size.

Microchip recently bought Atmel, hence the processor provider name change.

The Zero has not supplanted the venerable Arduino Uno, yet, but the day draws closer where there are no arguments for selecting the more modern chip. Variants are smaller and much easier for manufacturers to incorporate. The Arduino Zero software is defining a new generation of compatible boards, especially from Adafruit.com which is revising a number of their microcontroller boards to use the SAMD chips. The third party boards are often less expensive than the Zero as the Zero design uses an additional debug hardware chip not used by most hobbyists.

It is conceivable that Microchip may look to discontinue AVR production through price hikes, leaving the SAMD and possibly their own PIC lines more widely available.
Arduino Zero (photo via Adafruit)
Where does the flood of Arduino compatibles leave the Arduino team?  Actually in a fairly good spot. The team are the Research and Development group foremost, providing both the low level chip firmware and the ever more powerful IDE to tap into new chips. The Arduino team continues to bring forward very compelling boards in different form factors: the Arduino Zero, MKR1000, and MKRZero boards have a great amount of capability at a cost lower than the Arduino Uno of old.

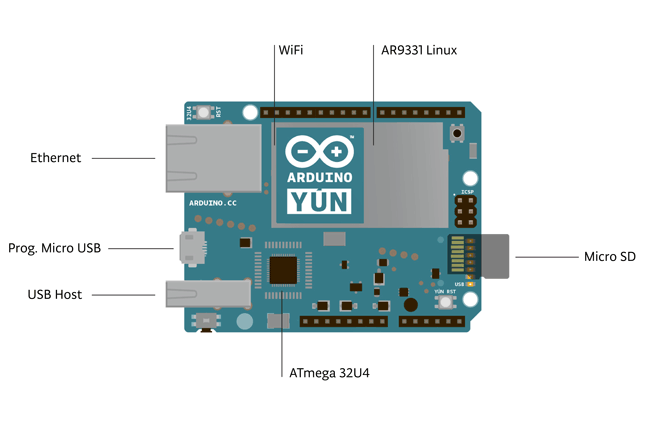
The Arduino team also has been collaborating on non-Microchip boards, including Arduino Yun, Arduino 101, and others. They also are important in expanding both the capabilities of the Arduino ecosphere and in partnering with companies other than Microchip to include Intel. The ability to easily use new, powerful microcontrollers and Linux based processors only benefits the ability of both companies and Makers to use the newer processors.

We all can look forward to the growth of the Arduino family tree, which has grown from a seedling over ten years ago. The innovation of the Arduino team has enabled people worldwide to harness some incredible hardware in making incredible products.

Saturday, January 31, 2015

Arduino Yun, Getting Up Fast (Work In Progress)

This is a work in progress, if you see issues, post in the comments.

The Arduino Yun is an interesting part of the Arduino family.  It provides both an Arduino Leonardo based ATmega32u4 with a Linux Wifi system on a chip.
Using this particular board for the first time, here are some tips for those who know Arduino to get up and going more quickly than going piecemeal through the official Getting Started documentation and other Internet tutorials.

Power and Connections

You will want a USB A to Micro B cable, standard for most phones and electronics these days. Ensure it is a good one (decent wire gauge, not damaged) with both data and power wires.

Safely powering Yun via a regular 500ma standard USB port

Per this arduino.cc post, verified roughly with my USB meter, measured current:
  • Stock system booted, no connection, no sd: 200 ma~270 ma Seems to like to hover around 235~245 ma but could peak to 300 ma.
  • Stock system booted, with wired (CAT5) networking: 277 ma
  • Stock system booted, with wired (CAT5) networking, max load: 315 ma
So a regular USB 2.0 or 3.0 port will work with some power to spare.

Powering via a Power Supply

You need a 5 Volt supply that will give you at least 500 milliamps.  Do NOT use a higher level supply and expect circuitry to handle it, it cannot.  You will connect power into the micro B USB port (kinda like Raspberry Pi).  But unlike the Pi, that port is also used to upload code to the Yun if you don't use USB uploading (more later).

Configuration

Now that the Yun is powered, some of the LED status lights come on if everything is ok.  Now to start talking to the Yun.

Referring to the Yun as a local device instead of by trying to figure out its IP address every time


The Yún is set from the factory to use Bonjour services for auto-discovery on a wireless network. This service is not included with Windows by default. If you do not have Bonjour already installed, you can download the service from here. Additionally, you should make sure any anti-virus software is not blocking communication on port 5353.


Connecting to Configure Yun


There is a web page that allows you to configure many of the different options available. The interface (called LuCi) gives you access to most any setting you would need for maintaining the WiFi interface.


Configuring the onboard WiFi - see http://arduino.cc/en/Guide/ArduinoYun#toc13


The Yún can connect to an existing network. The Yún can connect to unencrypted networks, as well as networks that support WEP, WPA, and WPA2 encryption.


When you first power on the Yún, it will create a WiFi network called ArduinoYun-XXXXXXXXXXXX. Connect your computer to this network.


Once you've obtained an IP address, open a web browser, and enter either:
  1. http://arduino.local (if Bonjour is on) or 
  2. 192.168.240.1 in the address bar (the default Yun address).  No luck?  
  3. If you open the Arduino IDE (again version 1.5.8 or higher), select Yun in Tools->Board, then look under Tools->Port and you should see the IP address the IDE has found for the Yun (after the powered-up Yun has booted up and talks to your network).  Use that IP address in your web browser.  
  4. If you still do not have a web address, check your network.  Is your wifi working and handing out addresses via DHCP (pretty standard)? 
  5. You can aleays hook a wired ethernet cable to the Ethernet jack, wait a bit and try the Arduino IDE method.  If you have a properly configured network, this should result in the Arduino IDE picking up on the address on the network.
Once you enter the address determined in the steps above into your PC's web browser, a web page will appear asking for a password. Enter "arduino" (the default password) and click the Log In button.


You will find a page with some diagnostic information about the current network connections. The first is your WiFi interface, the second is your Ethernet connection. Press the Configure button to proceed.
You might only have one connection (wired shown above) but if you have an Ethernet cable, and it has connected via WiFi, it may be connected via both with two separate addresses (that is ok).

On the new page, you will configure your Yún, giving it a unique name and identifying what network you want to connect to.


In the Yún NAME field, give your Arduino a unique name. You'll use this to refer to your Yun in the future, write it down.


Choose a password of 8 or more characters for your Arduino. If you leave this field blank, the system retains the default password of arduino - write this down also.


If you wish, you can set the timezone and country. It is recommended to set these options as it may help connecting to local WiFi networks. Setting the local timezone also selects the country's regulatory domain.


Enter the name of the wiFi network you wish to connect to. Select the security type, and enter the password.  Once you finish including the wifi, you'll get a confirmation like the one below (that person had named their wifi sharkrepellant, yours will be different.


Arduino IDE

Getting the Right Arduino IDE

You'll need version 1.5.4 or higher of the Arduino IDE.  Download the latest at this page.  As of this writing, the latest is 1.5.8 beta and I now release candidates are being tested for 1.6.0.  Be sure you do NOT download the Arduino IDE versions especially tailored for the Intel Galileo and Edison boards.


The 1.0.6 version of the IDE will not support Yun.  


Also, big bummer, 1.5.8 will INSIST you uninstall 1.0.6 to load.  I dislike not being able to install where I wish and have multiple instances but there was no way around it.


The installer will load the device driver for Windows.


IDE Settings


From the Tools -> Board menu, be sure to select Arduino Yun.  It probably is not a default value, check it.  

Linux Command Line

Getting to the Linux Command Line

For Linux or Mac, go to a command line and run OpenSSH


For Windows: Install PuTTY or Git for Windows which includes a shell that has OpenSSH.


To log in try:

C:\Users\Me\Documents\GitHub> ssh -l root MyYunName.local
where MyYunName is the Yun's name chosen above.  That is a lower-case L after the -.  You can use the IP address (like 192.168.240.1) instead of the local machine name.

You'll be asked for a password:

root@MyYunName.local's password:
Type in the name of the password you choose in configuring the Yun.  The default is arduino.

You should now get the Busybox shell and OpenWrt logos and be dropped at a prompt that looks like:


BusyBox v1.19.4 (2014-04-10 11:16:02 CEST) built-in shell (ash)

Enter 'help' for a list of built-in commands.
           _______                     ________        __
          |       |.-----.-----.-----.|  |  |  |.----.|  |_
          |   -   ||  _  |  -__|     ||  |  |  ||   _||   _|
          |_______||   __|_____|__|__||________||__|  |____|

                    |__| W I R E L E S S   F R E E D O M
                       -----------------------------------------------------------------------------------------

root@MyYunName:~#


Enable Public Key Athentication

To enable public key based authentication for root, the authorized public keys need to be added to the following file (and not the usual /root/.ssh/authorized_keys):

cat > /etc/dropbear/authorized_keys
press the <control-z> key
chmod 0600 /etc/dropbear/authorized_keys


A complete tutorial for setting up public key based authentication on OpenWRT can be found here.

Expanding the Yun Disk/File Space

The Arduino website has a good tutorial for this.  There is only about 7.5 Megabytes free.  Adding a MicroSD card storage allows for an overlay or extroot to expand the storage.  

If you plan on adding packages that will fill up Yun's space or create files that change alot (which is not good for flash memory), you'll want to do this.

Adding Linux Software Packages

To install additional software on Yun, you need to use the the Linux package manager opkg. For more information on the manager and some common commands, see the Yún package manager page.

Ensure your Yun Software is Up to Date

With the latest improvements from both the OpenWrt community and the Arduino community, version of OpenWrt-Yun installed on your Yún may be out of date. Please check the upgrade tutorial and be sure you're running the latest version available.

Setting up SFTP / SSHFS

Another thing you probably want to do: mount the Yun's filesystem on your desktop via SSH.
Below excerpted from Getting started with Arduino Yun and Autobahn.  Note it will take about 0.5 Megabytes of flash.

Mounting over SSH allows you to edit files on the Yun using your favorite editor directly on your desktop. So you don't need to fiddle with the Linux vi or other text editor editor inside a shell.


This is accomplished via SFTP (secure FTP), which is a FTP-like protocol that runs over SSH. On the Yun side, you'll need to have the SFTP package installed, login via SSH as root and type:


opkg update
opkg install openssh-sftp-server

Now, on Windows, you can use Win-SSHFS which you can download from here. It's open-source and installs without hassles. Just "Ok-Install" everything.


You'll get a small Puffy-fish icon in your quick launch bar, double click and configure a new virtual drive:

Yun's root filesystem mounted as Windows drive "I:"

When done and mounted, a new drive appears on your Windows machine, which maps to the remote Yun's root filesystem:


Yun's root filesystem mounted as a virtual drive

On Mac OSX, there is a tutorial here that walks you through setting things up with FUSE for OS X.


On Ubuntu, you can use Nautilus or the command line.


With SFTP set up, you now can simply open, edit, create, copy, delete and move files conveniently from your desktop. Which can often be more comfortable than doing everything via command line SSH.

Disable Console on Serial

You might need to use the serial connection between the MCU and the CPU. By default, there is a console attached on the Linux side to the serial, and that would need to be disabled.

Edit the file /etc/inittab and comment the following line (by preceding it with # which comments it out):


# ttyATH0::askfirst:/bin/ash --login

The Linux SoC (CPU) and the Atmel MCU are connected via a UART (a serial connection) which maps to the device /dev/ttyATH0 on the Linux side and the serial stream class Serial1 on the Arduino side. The default inittab entry on the Linux side will start a shell connected to that serial port when Linux boots. Then, when your sketch starts the Arduino Yun bridge library (by doing Bridge.begin()), the bridge library writes a command to the serial that will in turn start a script on the Linux side which then connects to the serial port. That Linux script is essentially the Linux-side part of the Yun bridge library and will keep on running regardless of whether you reload a new sketch to the MCU or reset the MCU. It will keep on running until you reset the CPU or reboot Linux (or manually kill the script). However, as long as there is a script running and using the serial port, we cannot use the serial for our purposes. The commenting of the inittab line will disable starting a shell on the serial port altogether in the first place. This means we can use the serial port for our stuff, but it also means you won't be able to use the Yun brigde library anymore.


and reboot Linux:


reboot


Be patient, a reboot (either via the reboot command like above, or by doing a cold boot via power cycling or pressing the "Yun RST" button) can take 60-90 seconds.

Environment Variables

Some programs look for data in system environment variables rather than editing them into your code. You can look at your environment variable list by typing env at a shell prompt.

To set an environment variable that will 'stick' in the current shell, type:

MYVARIABLE=myvalue
export MYVARIABLE

You can use any name you want for MYVARIABLE but it should not use spaces (use an underscore instead).  

References

1. Guide to the Arduino Yún, arduino.cc, accessed 2015-01-31
2. Getting started with Arduino Yun and Autobahn, 2013-12-01, Tobias Oberstein
3. Environment Variables, Ubuntu, accessed 2015-02-08