Showing posts with label Raspberry Pi 3. Show all posts

Sunday, November 11, 2018

Emulating MS-DOS on a Raspberry Pi and Playing Games using DOSBox

I have a soft spot for MS-DOS, as it was the first PC operating system I used. It started in 1984 with Compaq luggable computers available for loan at Caltech and at JPL when I worked there over the summer of '84. I don't ever recall using IBM's version, PC-DOS, as I never recall using IBM hardware. But thanks to using 100% IBM compatibles rather than offshoots like Tandy computers, it really didn't matter.

The first PC we bought, one of our first large purchases as a couple, was the first Compaq Deskpro (Model 1, 8086), Compaq's first foray into desktops after the success of the Compaq portable.

Compaq Deskpro Model 1 (8086) via this site.
So I have a soft spot for DOS computing.

I've wanted to put DOS on small, modern hardware for awhile. My first project is using the Raspberry Pi 3.

I have a RasPi mounted to the official Raspberry Pi display.
Raspberry Pi and official LCD display (photo via this site)
The only hardware you need to add is a keyboard (a mouse helps for setup). I have a couple of wired keyboards with built-in trackpads. Any USB keyboard that the Pi will recognize will do.

There are many Raspberry Pi tutorials on loading Dosbox, the MS-DOS emulator for Raspberry Pi. This one at PiMyLifeUp appears to be just fine, I think I followed a different one but they are very similar.

I set Dosbox to use the directory dos under /home/pi as my MS-DOS disk. I mapped this to drive C:\

I added a link to the graphical interface under games.

How to get the files from my PC to the Pi? There are many ways to do this, some more painful than others. 

I used this guide at Raspberry Pi HQ to use SAMBA to map my DOS directory as a network shareable location. This guide may also help.

I said public=yes which means anyone can access my Pi but I suggest you have the login. My SAMBA setup allows access to the entire /home/pi directory - you might want to just map the dos directory for more security.

In Windows file explorer, in the location bar type \\raspberrypi\pi and you should see your files. Note that you'll have to enter a password if you configured it.

Copy over your games. Our favorite is Rogue, redone for PC from the DEC VAX et al. sources. Wikipedia. You can play it in-browser here to try it out via Internet Archive (it's some sort of hacked copy there though). You can see it being played by someone in this Youtube video.

Rogue is in color and is ASCII graphics like alot of early text games and programs. I think our copy was ported from Unix and not a copy of the Epyx release, Techers did a lot of porting to MS-DOS from Unix back then.

I still had the original files from the '80s to I copied them over to the Pi and they appear in a subdirectory in Dosbox. And it runs like a champ!


If you are looking for MS-DOS Games/software, you can Google around. One site I found is abandonia.com which looks good. In all their software, they have Rogue also if you want it.

Hopefully this has given you some ideas for how to set up your own MS-DOS emulator. If you think I skipped steps or it is unclear, there are other sites that may have better step by step.

I hope to run a real 8088 code emulator on hardware soon. It all depends on time.

Tuesday, March 29, 2016

Cross Compiling - Compile C Programs on Your Windows Machine for a Raspberry Pi - Use

This is the final of 5 posts on setting up and using a PC cross compiler to make Raspberry Pi programs.

Following the previous posts, we have the Raspberry Pi compatible gcc compiler on our PC with library files copied over from the current Raspbian Jessie. We also have an updated Pi ready to run programs.
The make utility is often used by professionals to pull together a collection of files to build a program and there is a copy of a compatible Windows Make utility in C:\SysGCC\bin.  But most Raspberry pi programs are not that complicated!  We can use gcc to make programs with only one source file. Let's try it out. Type or copy to the file HelloWorld.c in Notepad, Wordpad (text), or other text editor:

#include <stdio.h>

int main()
{
    printf("Hello, world\n");
}

If it looks different than an Arduino sketch, it is. It is standard C, straight out of Kernighan and Ritchie. Place the file HelloWorld.c into a fresh program directory. The following Windows Command ("Batch") file helps automate the compile process - copy this to another text file called gcc.bat:

@ECHO OFF
SET PATH=%PATH%;C:\SysGCC\bin
IF %1.==. GOTO NOARG
@ECHO ON
C:\SysGCC\bin\arm-linux-gnueabihf-g++.exe %1.c -o %1
@ECHO OFF
if errorlevel 1 (
   ECHO Compile Fail - error %errorlevel%
   exit /b %errorlevel%
)
GOTO END1
:NOARG
  ECHO Must enter parameter like "C:\> gcc myfile" (no .c needed)
GOTO END1
:END1

If you installed the compiler into a different directory than C:\SysGCC, change the second and fourth lines to match.  All of this doesn't do anything fancy - it uses some command code (like a Unix shell script) to make sure you feed it a file name and that the compile worked (or not).

If you are in Windows File Explorer in the directory of your program, you'll see HelloWorld.c and gcc.bat. We will use a command line prompt to run the compiler (since it is a command program, not a graphical program). While holding the PC Shift key on the keyboard, right click the mouse in the Explorer window. Select the entry Open Command Window Here. You will have a Windows command window open in your program directory, which you can verify by typing the dir command. Compile your program by typing gcc <programname> - for our test, we'll type gcc HelloWorld (no .c should be typed).


With no error messages, your program worked!  You now have a file named HelloWorld (no extension) in the directory.  This is your Pi program.

Transferring Your Program to Your Pi

The binary executable file now needs to go from the PC to the Pi. This may be done in multiple ways but the simplest way is using the Pi Finder utility we used earlier.


Press the Upload button and select your HelloWorld file we just made in your project directory (do not select the HelloWorld.c file.  If you don't have a HelloWorld file, around 6,500 bytes, go back to compile it. When you complete the upload process, the file is in your ~/home/pi directory:


You need to execute the command chmod +x HelloWorld to tell the Pi the file is an executable (and not a data file). The file name will be in green when you type the file listing (directory) command ls.

Now you can execute your program (finally!) by typing ./HelloWorld (the preceding ./ tells Raspbian Linux we're executing the program in the current directory).  It prints Hello, world - success!

Going Further

Now we can build more complex programs, perhaps Arduino-like programs.  We'll explore these in coming blog posts.  Thanks for following this 5 post series and as always leave comments if you like, reshare with your colleagues & friends.

Other blog posts in this series:
  1. Introduction
  2. PC Setup
  3. Pi Setup
  4. Library Setup
  5. Use (this post)

Cross Compiling - Compile C Programs on Your Windows Machine for a Raspberry Pi - Library File Copy

This Part 4 of the posts on cross compiling Raspberry Pi programs on your PC.

From previous posts, we have the gcc cross compiler on the PC and a fresh Raspbian Jessie running on the Pi. The next step is to get the latest library files from the Pi over to the PC.

Fortunately those charitable folks at sysprogs have another utility to pull the correct files from your Pi to your PC.  If you installed gcc into C:\SysGCC (or substitute your own directory path), go to C:\SysGCC\TOOLS in Windows File Explorer.  Run UpdateSysroot.bat by double clicking it.  You'll get the pop-up window below:


Type in the IP address of your Pi. In the Adafruit Pi Finder, it gives you the address as 4 numbers separated by periods.You can run sudo ifconfig in a Pi terminal window to find the 4 number group IP address. Look at eth0 for wired connection, wlan0 for wireless.

Leave the other settings on their default values and press the Synchronize button. This will take several minutes and takes a few hundred megabytes of hard disk space on your PC.

Once the process is done, our setup is finally complete!  It would be a longer setup if we would have set up a full compile environment. The next post demonstrates compiling a program and using it on your Pi.

Other blog posts in this series:
  1. Introduction
  2. PC Setup
  3. Pi Setup
  4. Library Setup (this page)
  5. Use

Cross Compiling - Compile C Programs on Your Windows Machine for a Raspberry Pi - Pi Setup

This is Part 3 of the tutorial on compiling C/C++ programs for Raspberry Pi on Windows

This tutorial will set up the Raspberry Pi.  The latest version of the operating system used is Raspbian Jessie, using other OSes may change how you need to do things.

Let's look at our model again from Part 1:

We'll need the Pi to be communicating with our PC to do two things:
  1. A (probably one-time) copy of the library files the Pi uses to link in additional functionality. Using library files may be familiar from using Arduino. Instead of picking one or more libraries to use, we'll copy all the library files on the PC as space is not much of a concern on a PC file system and it isn't that large (hundreds of megabytes).
  2. We need a mechanism to copy the finished executable file from our PC to the Raspberry Pi.

Your Pi and its Rasbian Operating System

If you are starting fresh (you do not have an operating system SD card), I suggest following instructions on downloading and placing the OS image on a SD (or microSD) card. Tutorials:
Insert the card into the Raspberry Pi. Boot your Pi with a keyboard, monitor, and network connection. If you need to connect to your Pi via your PC (sometimes called running headless), I suggest running the Adafruit utility Pi Finder.
This program has several advantages:
  • You can click the Terminal button to get a command line window access to the Pi
  • The Upload button will very quickly upload files to your Pi (perfect for compiled executables!)
  • Shut down your pi the correct way

Ensure a Fresh OS

To be sure we're running the newest operating system patches (which include possible library changes), we need to freshen things up. 

Configure your Pi:
  • via the command line, use guide here
  • via the graphical interface at Menu Button -> Preferences -> Raspberry Pi Configuration
  • Allow Secure Shell (SSH) connections during configuration.
For configuration be sure to select your locale and keyboard to match where you are and what you have. Setting the time zone is good as well as expanding your file system if your card is larger than 4 GB.

Now to update your Pi's software:
  • If you're in the graphical environment, click the computer screen icon to get a command line terminal
  • upgrade your software via this Raspberry Pi Tutorial
Now everything is (hopefully) running the latest Raspbian Jessie with all updates. We can now get the compiler loaded with all the libraries on your Pi!

Other blog posts in this series:

  1. Introduction
  2. PC Setup
  3. Pi Setup
  4. Library Setup
  5. Use


Cross Compiling - Compile C Programs on Your Windows Machine for a Raspberry Pi - PC Setup

This is Part 2 of the series on cross compiling on the PC for the Raspberry Pi.

Let's set up a Windows computer to allow for Raspberry Pi cross compiling.

As stated in the original post, there are several ways to get a toolchain for cross compiling, often involving making your Windows PC more like a Linux/Unix machine. This involves more work than most people are looking for.

This effort leverages prior work to build the toolchain by sysprogs.com. They have posted a large number of cross compilers pre-built under the GNU license.

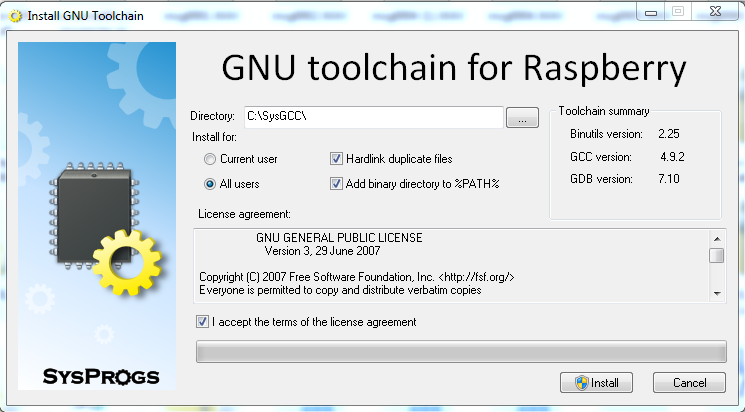
Download the latest toolchain for Raspbian Jessie (gcc 4.9.2 as of this tutorial). Run the program and you'll get the following screen:

Due to the Unix roots for cross compilers, you need to set an installation directory without spaces in any directory name.  This rules out the typical Windows Program Files directory.  I selected C:\SysGCC.

The installation takes several minutes, even on a fast PC as there are a large number of files involved. There will not be any icon for the desktop as the tools are for command line use.

That's it, your tools will be placed in the directory you specified.  Remember the location.

The cross compiler will not have the latest libraries for the Raspberry Pi that are included in the Raspbian Jessie distribution.  These are needed as they are linked in, used by the compiler to add pre-built functionality to a program at compile time. The easiest way to get a fresh set is to copy over the files from specific directories on an up to date Raspberry Pi.  This will be done in the next post.

Other blog posts in this series:

  1. Introduction
  2. PC Setup
  3. Pi Setup
  4. Library Setup
  5. Use

Monday, March 28, 2016

Cross Compiling - Compile C Programs on Your Windows Machine for a Raspberry Pi - Introduction

Cross Compiling is the process of making an executable program for one computer with the goal of running the program on another (different) computer. This can be very handy! Your desktop or laptop is probably more capable than your Raspberry Pi or other development device. Your PC has the edge with a better display, more memory, and speed.

With compiled programs like C and C++, this can be a more ideal procedure when compared to Python which is interpreted on the fly (thus no speed increase by doing compilation beforehand). Many people are familiar with C and C++ as the basis for the programming when using the Arduino development environment.

The diagram below shows how this would be accomplished.
The open source gcc compiler can generate code for many different computers. What we are looking for in this series is a Windows executable compiler which generates Raspberry Pi executables. There are many more combinations. Raspberry Pi cross compilers most often use Linux as the PC-side operating system and you can find Mac hosts as well.

Unfortunately, getting the cross compiler is not as simple as going to the Raspberry Pi website or GitHub repository (at present). The code for building the gcc toolchain (the programs that make up the cross compiler) is available but you need a native compiler (in this case Windows) and an environment that will take the source code and make the tools you want. Since gcc is a compiler that is Unix/Linux centric, you can set up an environment that helps Windows work more like *nix, the most common two being MinGW and Cygwin. This complicates the upfront work to set things up, something that we'd like to avoid at present.

The tutorial in following posts will demonstrate an effective cross compile process by using tools developed by SysProgs and Adafruit.

  1. This introduction
  2. PC Setup
  3. Pi Setup
  4. Library Setup
  5. Use


Monday, February 29, 2016

Two Raspberry Pi 3 Hardware Hacks

No sooner has the Raspberry Pi 3 been released, let's see about making it better. I'll point out a couple of items not widely discussed that may lead you to your hacking.

Unpopulated uFL Connector


The Raspberry Pi 3 has built-in Wi-Fi and Bluetooth.  The standard antenna is a board mounted chip connector circled in red on the front side of the board below:

Front View
And look on the back below.  The red circle shows the blank PCB area opposite the front chip antenna (you don't want parts here to avoid interference).  All good.

Rear View
Now look at the 2 copper pads marked J13 circled in orange. The area between the copper squares is about the same area that would be occupied by a uFL antenna connection.  What type of connection is that? uFL connectors are very small surface-mount parts used when an external RF antenna is desired. They used on GPS and Wi-Fi boards.
Close-up of pad J13 and a uFL solder connector (not to the same scale)
The solder mount uFL connector shown at right above are available for around a dollar at many electronics outlets.  Most of those same outlets have inexpensive external antennas to connect to the uFL connector. Be careful, these connectors are somewhat fragile (they bend or crush if the mating plug is pushed on wrong). You can also find uFL to SMA and uFL to RP-SMA adapter cables to use larger antennas or use panel mount antennas.


Touch Screen Connector


The rear picture above has a spot shown in yellow.  This is opposite the HDMI connector on the front.  It is not shown with any part soldered there above and on the Raspberry Pi 2.  But the FCC testing picture of the rear shows a ribbon cable connector on the board.
Leaked Raspberry Pi 3 FCC Testing Board with Populated Connector
This connector is similar to the one used on the interface board for the Raspberry Pi official 7 inch touchscreen display.  I suspect this is for a touch interface but it is not documented or labelled.  Other iterations of the Pi have had test points here.  Why does this get so much attention but no parts or documentation?  It's up to us to us. Do note that hardware modifications may void your warranty or change the wireless certification. . .

There is so much potential to this third generation board.  Let me know if you have found things to do with it.