Monday, May 27, 2013

Retro Projects: College 1983-1985

The third of a trilogy.  You'll notice 1980-1983 was a hiatus as I was in Liberal Arts at Whitman College and not in engineering school.  1983 I packed my belongings into a '76 AMC Pacer and I drove to Pasadena, California.  Jumping into my junior year (second, having a junior year at Whitman also), my classes were nearly all math and engineering.  Scary and exciting both.

Caltech had many things the schools of the northwest did not - while Whitman had an HP3000 minicomputer, Tech offered VAX and other computers including the new Compaq lugable "PCs" running MS-DOS.  With a bit of ingenuity, one could copy over microcontroller cross-compilers and compile them on the Compaq, freeing you to programming outside the lab.

Microprocessors of the day included the 6800 and the Z80, with some fancier folks using the 6809 or even the 8086 on the PCs.  The big gun was the Motorola 68000 which later powered the early Macintoshes.  Handling 16 bit addressing required double the hardware and more support glue chips.

A Digitalk speech synthesizer circa 1984
For labs, you could not simply build a microprocessor circuit.  It had to have a cool function.  Like my classmate who hacked the scoreboard of the Rose Bowl (and did get class credit for the hardware).  My first project was a speech synthesizer using a 6809E microprocessor with the Digitalker chip set.  Unlike the later phoneme chips, this set did a ROM lookup of a fixed vocabulary.  I write a small interpreter to accept commands via an RS232 connection. RS232 was the defacto communications protocol complete with the requirement for a +12 and -12 power supply in addition to 5 volts for the logic.

Here is the project in the completed metal case (which were still prevalent even though they harken back to tube projects).

Projects used alot of DIP packages wire wrapped together
A close-up of the 6809 logic, clock generator, ROM, etc.  We buffered all the address lines.
ROM was UVEPROM, shown with a sticker over the mica window
To show versatility in my projects, I built an acoustic modem, gutting a surplus unit and building in a new chipset and dialing capability.  Hacking a cheap phone keypad was tougher than planned,, and I had to add individual buttons under the keypad matrix to get it finished.  It brought touch tone into the "modem age".
No, the Hayes modem wasn't in vogue yet, costing
somewhere north of $500


What a hack on the keypad
One failed project in here was a communications converter - planned to be a RS-232 / Centronics / IEEE-488 translator box.  Doing one way would have been enough but an insistent TA and alot of soul searching killed the attempt.

Final project, Fall 1984 was designed as a VT100 terminal emulator using a 68000 microprocessor.  A beefy power supply, and video system were additions.  I had to delay finishing until after Christmas as I spent hours tracking down a softwre issue that appeared to be a hardware fault.  It turned out the assembly code needed an odd alignment directive, then it worked like a champ.  I did not implement the full VT100 due to the bug but it was pretty big for the day.  I had two interviews with Apple that year, perhaps I could have been on the Mac team if it hadn't been a recession?


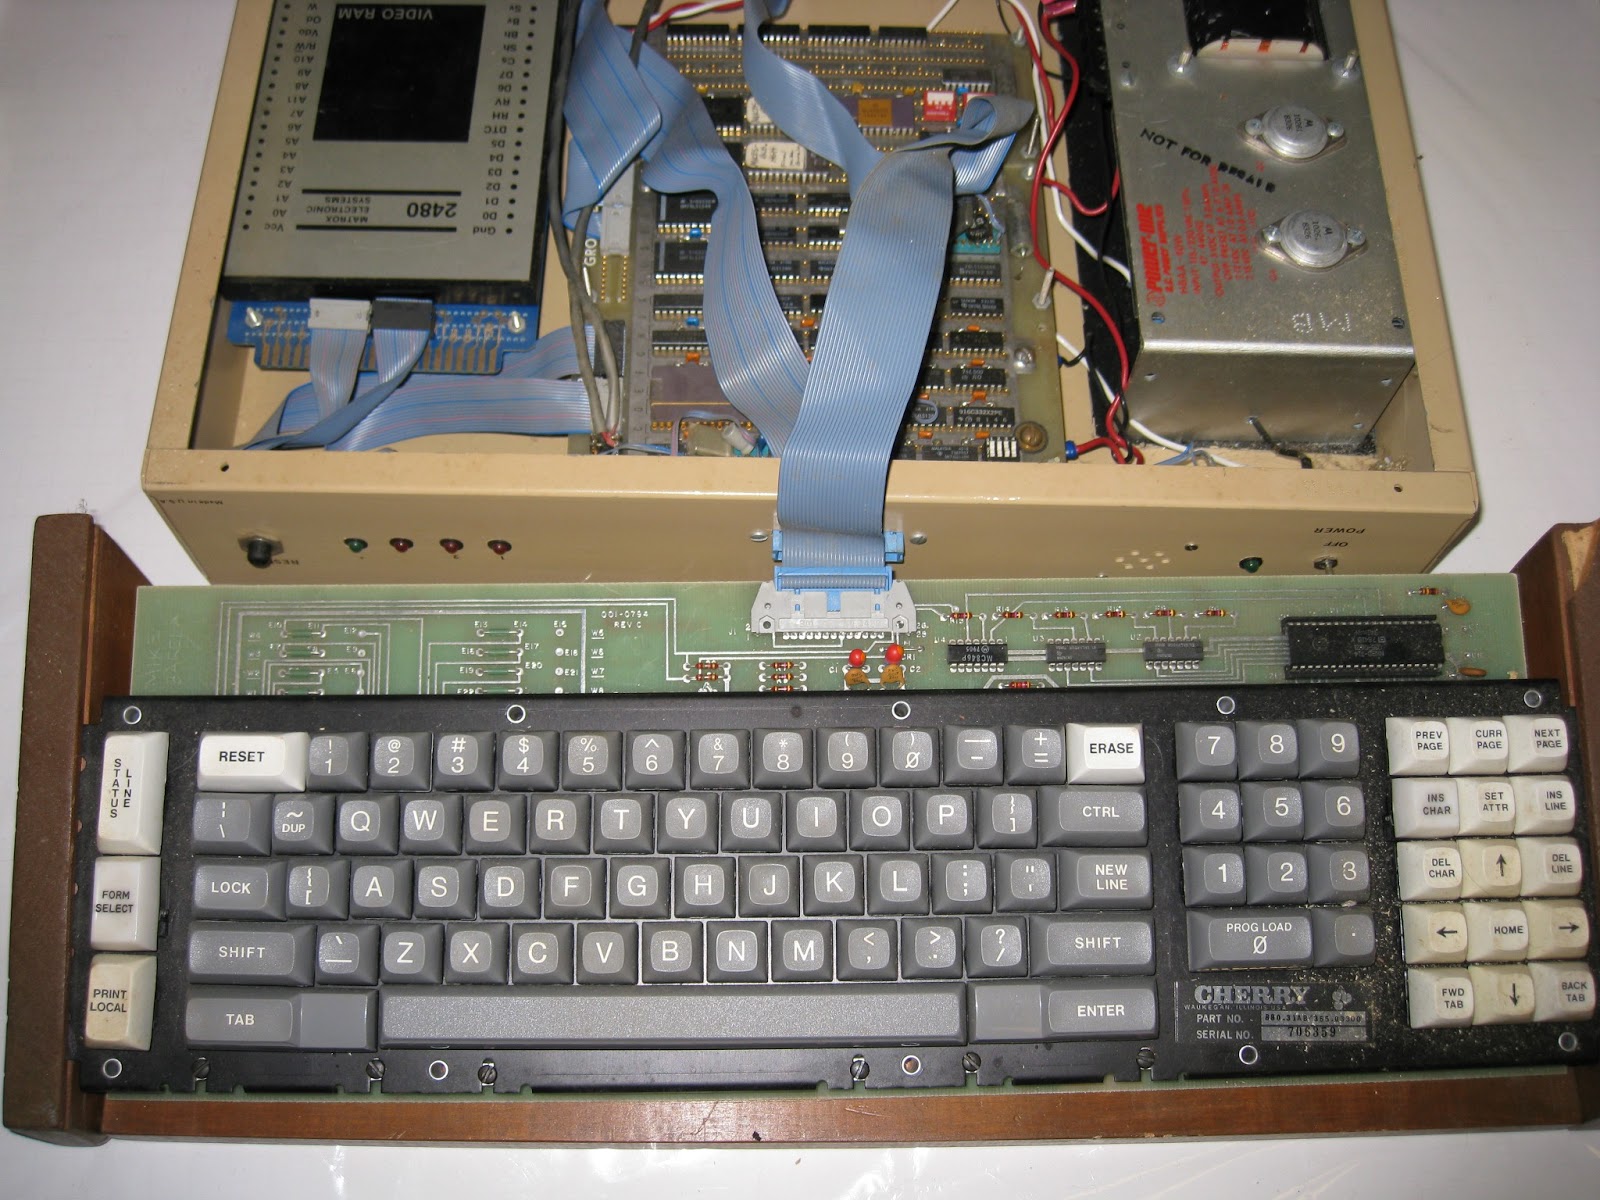
Maybe I should convert this keyboard to USB like the LadyAda/Phil NeXT keyboard decoder?  It's a Cherry, top of the line.

The keyboard is a Cherry that was at the surplus store.  I had to figure out the protocol, then wire it up to the unit.  I made a stained wooden holder for it - I am still amazed at the craftsmanship one can do and still be taking classes, looking for a job and living with my new bride.

That's the early days.  My career did not kick off in hardware engineering like I had wanted.  The electronics at home would sit mostly packed away for over twenty five years while I built and programmed PCs as a hobby.  But the Maker movement came at a time when I was looking for more, and the rest is here in this blog.  Thanks for tuning in.

Retro Projects: 1979-1980

The second in a series, I'll list some of the projects I did back a generation ago.  After experimenting with Radio Shack kits and schematics, I started working with digital circuits.  Without the Internet, hobbyists used books and periodicals such as Popular Electronics to learn about circuitry.

I was fascinated with LEDs, 7 segment displays, and digital counting.  Chapter 5 combined several concepts: 555 timer pulse generator, 7490 decade counter and the 7447 binary to 7 segment decoder.  It was digital magic to take pulses, count them in binary, then have the binary display as an LED digit.

Of course the Going Further section discussed chaining the circuit to additional digits.  I decided to go for a three segment counter.  If I'd calculated the bill of materials (BOM) I probably would have reconsidered but I made the boards with blanking switches and put it in a nice case.

The front - rather tidy by project standards

Telephone wire was the hookup wire of choice
All the switches were overkill I know now but brought out all the functionality of the counting circuitry.
I was asked by my physics teacher if I could use a rotary telephone to dial digits to add the numbers.  I said yes, finding the pulse generator within the phone and breadboarding the counting circuit.  One morning, the voltage from my Radio Shack power supply was on but appeared to be zero, so I cranked it up.  Rookie mistake, the meter was on amps and in a flash I let the blue smoke out of the chips.
A classic Radio Shack power supply - just be sure the meter is switched to volts before adjusting or you may encounter blue smoke from your chips.  The cable is modern, banana plugs to 2.1mm jack and some Sugru.
This period saw a decline in my electronics as graduation and girlfriend sapped time and car and impending college sapped money.

Boldly, I applied directly to MIT and Caltech, against my counselor's guidance.  My test scores were good but not top notch so I was not accepted.  But a small liberal arts college recruited me and with their 3-2 engineering program with Caltech, I did well - going to the engineering school I wanted and learning a bit about liberal arts didn't hurt either.  But it meant about a three year hiatus on my electronics tinkering (athough I spent summers at Hewlett-Packard assembling electronics).

Next I'll discuss a rediscovery of electronics, learning electrical engineering (on the fast track), and digital electronics projects.

Sunday, May 26, 2013

Retro Projects: Up to 1978

This post starts a short series of posts on projects past.  I cannot say when I actually started into electronics, sometime around 16 perhaps.  This era was dominated by Radio Shack.  They had nearly any part you could want.  And they has books and kits to help you get started.

Radio Shack Project Books by Forest M. Mims, III
Project Instructions
The kits generally had memorable plastic project boxes with a grid of holes to anchor parts.
A Field Strength Meter with a diode and transistor
You could buy boxes separately - they made good speaker boxes for a homemade intercom

With project books, it was a natural that experimenters would buy lots of parts.  And they did.  I'm not sure the company got rich doing so but they carried parts for years before discovering selling cell phones was more important.

Once one graduated from projects, one would start modifying electronics from other sources.
Power supply from a clock repurposed for projects

Repurposing an old radio as an amplifier case

Probing an old radio finds the output amplifier
Pretty soon I was making my own projects.  Again many from books or articles but possibly modified.
Decision maker with neon bulbs
I have a couple of LED projects in this genre not shown.

Finally I decide to make more polished project cases.  Here is a 555 function generator with changable frequency in a nice case.
The range changes the capacitor while the tuning used a potentiometer in the 555 circuit
With this group of projects under my belt, I start to graduate towards digital circuits, which will be the subject of the next post.

Saturday, May 18, 2013

Arduino IDE New Version 1.0.5 and Arduino GTFT Support

The Arduino Team released a new version 1.0.5 of their development environment (the last planned for the version 1 fork).  Subsequent revisions will be on the version 1.5 form which supports both traditional AVR Arduinos and the Arduino Due systems.

This version adds support for some of the newly announced products to include the GTFT display for the Arduino Robot and Esplora.
Specifically for Esplora, the Esplora libraries have been augmented to contain display writing capability.  This is based on the Adafruit libraries for the ST7735 display and GFX high level drawing routines.

Basically the new TFT library supports the ST7735 on any Arduino.  The EsploraTFT routines implement the same functions but do not have to have pin numbers passed in the begin routine as they are already known (and that I documented in a previous post).

The documentation for EsploraTFT is a bit light.  You should look at the TFT library and use EsploraTFT as the instance of the display (all calls are in the form EsploraTFT.begin, EsploraTFT.background, etc.)

Finding examples may be trickier than expected.  There are Esplora TFT examples but they are not in the Examples-Esplora area.  They are in the Examples-TFT-Esplora tree.  There are some interesting examples demonstrating the Esplora:
  1. Esplora TFT Bitmap Logo: Read an image file from a micro-SD card and draw it at random locations.
  2. Esplora TFT Color Picker: Using the joystick and slider, change the color of the TFT screen
  3. Esplora TFT Etch a Sketch: An Esplora implementation of the classic Etch-a-Sketch
  4. Esplora TFT Graph: Graph the values from the light sensor to the TFT
  5. Esplora TFT Horizon: Draw an artificial horizon line based on the tilt from the accelerometer
  6. Esplora TFT Pong: A basic implementation of the classic game
  7. Esplora TFT Temperature: Check the temperature with the onboard sensor and display it on screen
I have tried these examples with the Adafruit 1.8" TFT Display and they work with it as well (although I did not try the SD card bitmap as I didn't have everything to do it).
The Pong game I ported has a few bells and whistles the example does not

More information

Thursday, May 16, 2013

New: Microcenter stockup, RasPi Camera, and more

Several items for today.  First, Microcenter is continuing their expansion into electronics.
Pi now served at Microcenter (White Boxes)
Their stock of Raspberry Pi is complete with many Model B units (in slim and large boxes) at $39.99.  Digging in, I found 3 Model A units among the others at $29.99.  I found three cases (lower left) elsewhere and moved them to the same shelf.  Their semi-monthly circular is due soon, I have a feeling they might discount the Pi.  I picked up one of the $5.99 Digisparks to play with :-)

They have expanded their stock of Sparkfun products.
Sparkfun blister packs at Microcenter

They also have many kits by NightFire Electronics.  New to me.  Their website to browse is at http://vakits.com/.

Finally I picked up one of the Digispark boards as I did not get in on the Kickstarter as it was my early days rediscovering electronics.


Raspberry Pi Camera Arrives

I'll hand it to Newark/Element 14, they are efficient at filling Raspberry Pi camera orders.  They shipped in an envelope that was crushed a bit and not fully sealed but everything was there.  Projected project: A wifi camera for outside if I can find a case to hold it without getting wet.  Ideas?
The camera is smaller than I expected
This week from China

I order some parts from China when I am not in a hurry and want good prices.  This week I received an RS232 TTL to signal level converter board using the MAX3232.  Not bad for $1.25 shipped via eBay.


Tuesday, May 14, 2013

More on the Arduino Robot

Arduino co-founder Massimo Banzi discusses the new Arduino Robot in his debut weekly column for Make.

Banzi states:
After two years of hard work, experimentation, testing, and ups and downs, I’m happy to announce that our robot is ready. The Arduino Robot will be alive with us for the first time during Maker Faire Bay Area where I will show you its features and you’ll be able to experience what its capabilities are. But for us it’s not only a matter of launching a new product. It’s more important to share with you a story of how a passion for tinkering is helping us explore new, unexpected roads. That’s why I asked David Cuartielles, co-founder of Arduino and the member of our team who has spent more time and sweat on it, to reveal how it all happened ... In the last three years David moved from knowing nothing about robots to becoming an amateur roboticist with a strong interest in educational robotics. The Arduino Robot is the result of the collective effort from an international team looking at learning science fun. Arduino is now on wheels. 
You can read about the history of David's robotic journey in the article.

And for more pictures and videos, see my previous post on the Arduino Robot.

Friday, May 10, 2013

New Official Arduino Robot Coming Out

A new robot system is being introduced by the Arduino team.

Earlier thought to be the Logo robot (due to a video post title), it is now just the Arduino Robot.

Specifications

The robot has two motorized wheels and gearboxes.  It has two decks (lower for motors and sensors, upper for sensors and display).  It appears to share the upcoming 1.8 inch TFT LCD display module destined for use on the Esplora.  There is a buzzer, rotary encoder, 8 Tinkerkit inputs (upper deck), and USB port on the top deck, possibly more below.  This would imply a fair number of microprocessor pins, perhaps the Mega or even Due processor onboard (the Mega would be a better guess)?


New: There are several videos of this robot, all at http://vimeo.com/user433152
  1. Line following May 11th p.m. http://vimeo.com/65925980
  2. The test with Logo-type programming released May 11th http://vimeo.com/65901813
  3. Discobot test (2 weeks earlier) http://vimeo.com/64912650
  4. Hello user (2 weeks earlier) http://vimeo.com/64761574
  5. Line Following (2 weeks earlier) http://vimeo.com/64728217 (which if it is following a line at the same speed as the video, it would be impressive.  Is the line follower sensor stock or a Tinkerkit sensor?)
  6. Music for the robot (1 month earlier) http://vimeo.com/62336645
The bots apparently are being developed in Malmo, Sweden.   Known collaborators:
Collaboration on this project, including prototype work and code, has been done by Complubot in Spain.  Their page is at http://complubot.educa.madrid.org/pre/pre.php

Side View showing motors and gear boxes.

Prototype Work: The Lottie Lemon

It would appear that some details on this platform have been available since Maker Faire 2011 (when the Due and Leonardo were discussed).  There is a picture here but it would appear that things have evolved since.

The Arduino Robot looks like prototypes nicknamed the Lottie Lemon also in cooperation with Complubot.  There are pictures here, and a video here.  The Lemon appears to use two Arduino Nano units whereas the new Arduino Robot has on-board processor(s).  More information on the Lottie Lemon is on the Arduino Wiki here and a comprehensive video from Complubot on the Lottie Lemon (Spanish with English subtitles) is here.

The final prototypes, based more on the Arduino Robot board set, appear to have been tested at Robocup 2012.  Pictures and information are here.
The Lottie Lemon boards - note the display is a Nokia type and the processor looks like an Arduino Nano in a socket.


More details as I get them.

Tuesday, May 7, 2013

Arduino Competition Causing Pricing Pressure

The assault by the microcontroller industry on the $30 Arduino Uno and its siblings is in full effect.

Once something becomes popular, people want them but prefer them cheaper, better, or faster.

The Arduino team has been working on this with mixed results.  The bigger and faster Due is still in a sort of beta with very poor software support compared to the mainstream Uno. The lack of add-on boards supporting the software and lower operating voltage has severely limited widespread adoption.  Better - in the form of Leonardo - has been very quiet except for the adoption of the chip and bootloader into many competing products (some rather good).  The Esplora is now carried in stores beyond the Radio Shack launch partner but the Esplora forum on the Arduino site is crickets, no activity.  All of this, with prices showing very little flexibility in the last year.  Those companies that priced the Uno at $35 have tended to lower the it to a fixed $29.95 price point.  Only Microcenter has shown flexibility, pricing the Uno down to $15 before relenting and having it bounce back to $25.  Finally Sainsmart has lowered their Arduino Mega R3 board down to $16.99.

Competition

1. Kickstarter - it seems everyone can and has come up with Arduino clones in every shape and size.  The trend though is than they are nearly always less expensive, the tiny ones very much so.  Keep an eye on the Spark Core that is red hot.

2. Clones using better chips - the Teensy and recently a line of Freescale processors have offered more capability at cheaper price points.

3. The big boys - yes the Raspberry Pi is not an Arduino competitor but adjunct, yes?  Yes and No.  Some of the Arduino's educational sales may be on hold while they learn about the Pi.  Boards like the Coocox Embedded Pi allow a Raspberry Pi to act as an arduino with shield support at an Uno price.  Finally the wildly popular UDOO combines Arduino Due and 4 times the Raspberry Pi power into one board.  The market also is receiving price pressure from Android and even small PC board makers with prices from $50 to $100.

Will innovation keep the official Arduino platform at current prices or will we see pressure to move manufacturing to Wales, UK (unlikely).

Sunday, May 5, 2013

Adafruit Show & Tell Demo on May 4th

I was able to join the Adafruit Show & Tell on Google+ last night.  I demonstrated my Carnac-like prognosticator and a bit on Esplora.


The Adafruit article is at http://www.adafruit.com/blog/2013/05/04/show-and-tell-542013/

For appearing, you get to receive this cool sticker

For more information:


Thursday, May 2, 2013

Arduino Esplora Widely Available

Radioshack's exclusivity with the Arduino Esplora has expired.  You can now buy the Esplora from Arduino.cc and Adafruit.


If you have a shiny new Esplora and want to build some cool projects, see the articles on this blog covering various aspects of the Esplora at http://21stdigitalhome.blogspot.com/search/label/Arduino%20Esplora.